Expert self-tanning tips and tricks for those hard-to-reach spots
January 1 | 7 minute read
Words by Samantha Brigden and Darcy Brown
Originally published on | July 9
When executed correctly, the glow boost achieved will level up your confidence, making little black dress moments even sweeter while bronzed limbs can even help disguise veins and cellulite.
But self-tanning isn’t always simple, from the undignified, solo-game-of-standing-Twister experience that is trying to tan your own back to the dreaded patchiness that plagues ankles and fingers once your guide colour has washed off.
Lucky for all of us, the founders of some of our favourite self-tanning brands – Jules Von Hep of Isle of Paradise, Elle Ferguson of ELEFFECT and Rhiannon Hall and Maddy Balderson of Luna Bronze – are here with all their insider tips and tricks to perfecting that seamless tan, even in the trickiest spots!

What are the biggest mistakes people make when self-tanning and how can they be prevented?
Without a doubt, all of our founders agreed on this one: a lack of preparation. According to Hall and Balderson, “Not preparing before your tan should be considered a beauty crime! In order to get a seamless, streak-free and, most importantly, undetectable tan result, you need to be focusing on preparing the skin.”
Ferguson agrees, explaining, “Just like you prep your face for makeup, you need to do the same with your body for the perfect tan application.”
So, what’s the best method for prepping your ‘tanvas’ (that’s tan canvas)? First, Hall and Balderson recommend “shaving 24 hours prior to your self-tan application – this is to ensure your skin has a chance to settle and pores close, so you don’t get those ‘fake tan dots’ on the skin.”
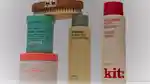
Next, exfoliating your skin is a necessary tanning prep step for getting rid of old self-tan or dead skin. Ferguson’s routine? Washing skin with a nourishing cleanser (like the ELEFFECT The Wash) then following up with an exfoliating tool (like The Exfoliating Mitt). We also love combining physical and chemical exfoliation with Frank Body’s Glycolic Body Scrub.
Hydrating your skin is also essential for a smooth tan. Moisturising is a vital step (and the secret to avoiding patchy joints, like elbows and ankles) for Von Hep, who tells us his mantra: “Repeat after me – if I don’t moisturise my hands, I will be left with tanned knuckles!”
Hall and Balderson agree, saying, “A dead giveaway that you have done a dodgy tan application are those not-so-cute patches on your elbows, hands and knees. Prior to your tan application, we recommend moisturising all the dry parts of the body, including your hands, feet, elbows, knees and underarms.”
Get the hydration going with ELEFFECT’s The Glow, a radiance-enhancing lotion specifically formulated to be safe to use both pre and post-tan. While you can moisturise your whole body the day before a tan, it’s best to only moisturise those super dry patches on tanning day. “Your skin should be freshly rinsed and dry prior to applying your tan but avoid the use of moisturisers or body oils pre-tan application,” warn Hall and Balderson.
What are the must-haves for tanning hard-to-reach spots?
“Each time you tan you get better at it, so trust me when I say practice really does make perfect!” Von Hep reminds us – but we could still do with all the help we can get. So, what are these tanning brand founders’ staples for getting a natural-looking tan on those trickier spots?
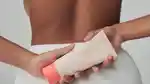
Luna Bronze released a tool to help with one of the most difficult spots to tan: the Self Tan Back Applicator, described by Hall and Balderson as “the tanning buddy of your dreams that doesn’t complain when it comes time to do your back!”
Or, if you can’t get your hands on this innovative tool, Ferguson has her own at-home hack: “My number-one trick is to place your applicator on the top of a wooden spoon and secure it with an elastic band. You then have an extra-long arm to apply your tan to your back!”
A brush is one of Von Hep’s tools of choice, which he picked up after working backstage at fashion shoots for years. “A brush has super fine follicles and can therefore blend a tan much more naturally than a face cloth or fingertips could,” he explains, adding, “When it comes to fine-tuning the glow and ensuring it looks natural, this is when a brush really comes into action.” He created Isle of Paradise’s Shape and Glow Big Blending Brush “to give everyone the opportunity to have that red carpet-worthy glow.”

What are the best tanning tips and tricks for…
Hands, knees, feet and elbows?
“Moisturising your hands, wrists, feet, knees and elbows is essential for an undetectable glow,” explain Hall and Balderson. Ferguson agrees, saying, “These areas are prone to dry skin. You need to ensure, in the lead up to your tan application, that you are keeping these areas super hydrated.”
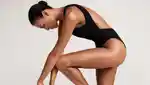
When it comes to applying your tan, Von Hep recommends “starting at the ankles and working your way up. Use what is left on the mitt to apply to hands and feet.”
The other key to keeping these areas free of patchiness is blending. Von Hep tells us, “After application, it’s time to buff and blend. Using a kabuki brush, sweep lightly over hairline, décolletage, wrists, knuckles, knees, elbows, feet and ankles. Take some micellar water and an old face cloth and remove any tan residue from palms, soles, nails and in between fingers.”
And he saved his favourite trick until last: “Hang an old towel on the back of your door and rub your wrists together – this removes those pesky tell-tale tan lines!”
Face and neck?
Ferguson describes face tanning as “the key to the kingdom”, helping you to look more relaxed and wear less makeup due to its complexion-evening and bronzing qualities. Blending is key here too, with Ferguson emphasising: “Ensure that you are blending all the way up to your hair line and lightly over the ears. The face fades a lot quicker than your body so you can top your face tan up every three to four days.”
She adds, “Naturally, your neck doesn’t tan at the same level as your body. Your neck is always a shade lighter than your chest, so use the excess tan on your mitt and blend this into your neck.”
Hall and Balderson caution against using a self-tanner designed for the body on the face, as it can lead to congestion. They recommend using one of Luna Bronze’s specifically designed face tanners: the Illume Tanning Mist or the Good Night – Face Bronzing Serum. They add, “Our biggest word of advice when using a self-tanner on your face is to know that applying your tanning product on the same day as an exfoliant (physical or chemical) will reduce or counteract the result of your self-tan. So, we recommend alternating days for these types of products if you want a bronzed, glowy visage.”
Back (without another person!)?
This is where Luna Bronze’s new Self-Tan Back Applicator comes in handy. The brand’s founders tell us, “All you have to do is pump mousse onto the centre of the applicator, grab both handles, flip it over and move the mitt up, down and side to side for an all-over, streak-free bronze. No need to bend yourself into a pretzel – our Self-Tan Back Applicator has you covered (evenly).”
Don’t have this tool on hand? Try Ferguson’s tip and attach your tanning mitt to a wooden spoon!

What is a beginner-friendly tanning product that makes it hard to mess up?
Just getting started with self-tanning? It’s normal to feel overwhelmed, but Hall and Balderson are here to help: “We often hear that people are intimidated by self-tanning. This is a barrier that we aim to knock down in order to help more people make the switch to sunless tanning! Self-tan beginners should look for untinted, buildable products for their first rodeo. Products like our Glow Gradual Tanning Moisturiser or Illume Tanning Mist are great. Both products not only offer optimum hydration but also have the colour profile toned back for a subtle, buildable tan.”
Von Hep recommends choosing a self-tan texture that works for your personal preference. From the Isle of Paradise lineup, he recommends either the Self-Tanning Mousse, Self-Tanning Water or Self-Tanning Drops. Each requires a slightly different application technique: “The mousse is applied directly onto a mitt and transferred onto skin, the water is sprayed directly onto skin before being buffed in with a mitt and the drops are added into your daily face and body moisturiser for added hydration and glow,” he explains. So, choose your own adventure!
Can you fix self-tan mistakes?
You’ve followed all the tips and tricks but still ended up with a faux tan that’s patchy or too dark. What now?! Luckily, the experts have solutions for that too! Ferguson even made an ELEFFECT product to help: The Tint. “It's a body makeup that can be used to cover up any mistakes that have been made when applying your self-tanner way after your bedtime,” she explains. Or, if you don’t have that one in your tanning toolkit, Hall and Balderson tell us, “If you’ve managed to muck up your mousse tan (we’ve all been there!), simply apply more to the spot that you’ve missed.”
Some mistakes aren’t made to be covered up though, so if you need to take your tan off and start afresh, there’s a few ways you can go about it. Hall and Balderson advise, “If the tan is still wet, then you can remove it with some warm water and soap by lightly dabbing or rubbing the area (be careful not to splash anywhere else!). Or, if the tan has dried, you can apply a chemical exfoliant with a cotton pad, gently rubbing to remove the tan.”
To ensure your faux tan fades naturally and completely, Von Hep proposes a three-day approach to full tan removal: “The best way to remove a tan is to slowly but surely ‘tease’ it off the skin over the course of three days. Simply mix a spoonful of sugar in with your body wash – each time you wash, a light layer of tan will come off, giving a gradual but even fade. On the last day, do a deep tan removal using the Isle of Paradise Over It Magic Self-Tan Eraser.”