We’re always celebrating what’s trending: the looks, the moments and products to know. Here, we show you how to recreate the most-wanted looks from our campaign, courtesy of makeup artist Shella Martin.
Contour, blush and highlighter have become mainstays of our makeup bags, with modern cream formulas making all three almost foolproof to apply. That said, subtle changes in placement can make a huge difference, creating the illusion of lifting, shaping, volume – whatever your heart (circle, oval or square-shaped face) desires!
So, we’re here to show you how to modernise your contour, blush and highlighter placement for a more youthful, natural appearance.
To start, we've got concealer in our sights; more specifically, applying a lot of it directly under the eye. While there are no rules in makeup, too much product can risk looking flat and is more likely to crease. Instead, try a more subtle approach – dot concealer on the outer eyes, inner corners, chin and forehead to bring light to the face and brighten shadows. (Don’t forget to fill the shadow next to the eye, the nose, around the eyes, and forehead to maintain a more natural look throughout the day!)


And we know that sculpting goes way beyond bronzer – strategic highlighter and blush placement can also work wonders when it comes to contouring! Highlighter applied in the wrong places can emphasise uneven texture, rather than lending to a fresh, glowy look; instead, try bringing the product further out on the high plane of the face, applying less on the chin, and limiting the rest of your application to the outer third of the brow bone and the small of the nose.
Finally, for blush, you can choose your own adventure – apply on the apples of the cheek to create volume, or create lift by applying the further up the cheekbone (can't find yours? A soft, gentle smile will bring them out!).
Love a step-by-step guide? Here's how Shella Martin does it...
- To start, apply a small amount of NARS Light Reflecting Foundation for a skin-like base.
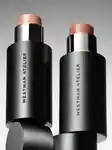
- With a cream bronzer or contour stick, like the Westman Atelier Face Trace Contour Stick, dot at the temples, under the cheekbone and jawline. Blend with a brush (try the MECCA MAX Tapered Powder Brush).
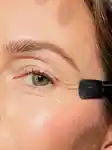
- Going in with the Kosas Revealer Concealer, brighten and add a little more coverage where needed. Try a light touch, dotting at the outer and inner corners of the eyes, chin and forehead. Blend with a small brush, like the MECCA MAX Soft Shadower Eye Blending Brush.
- If, at this stage, you decide you need a little more sculpting, take the Face Trace Contour Stick once again and contour the sides of the nose.
- For a lifted look, leave room for the Tom Ford Shade and Illuminate Contour Duo in 01. Place the illuminating shade just on the high planes of the face to give the illusion of bringing them forward.
- Add more light to keep the look three-dimensional; focus the same illuminating Tom Ford shade on the top of the nose’s bridge, the outer third of the brow, the side of the chin and the collarbones.
- Next, add a beautiful soft colour to the apple of the cheeks while making a very small smile – I love the Charlotte Tilbury Pillow Talk Matte Beauty Blush Wand in 'Pink Pop' for this. Blend it in with your fingertips.
- To finish, brush up your brows and add subtle, hair-like strokes throughout with the Kosas Brow Pop Dual-Action Defining Pencil.


